How to make crystal candy? If you've ever been mesmerized by the sparkling allure of crystal candy and wondered how to create these sugary gems at home, you're not alone. Crystal candy, with its dazzling appearance and delightful crunch, is a treat that captures the imagination of both children and adults alike. The process of making crystal candy is not only a fun kitchen experiment but also a chance to explore the wonders of sugar crystallization. Whether you're a curious beginner or a seasoned candy maker, this guide will walk you through each step of creating your very own edible crystals.
Crystal candy is more than just a sugary delight; it's an invitation to delve into the intersection of science and culinary art. The magic lies in the transformation of sugar into shimmering crystals, a process that can be as educational as it is enjoyable. This hands-on project is perfect for family activities, school science experiments, or simply indulging your sweet tooth with a homemade treat. The beauty of crystal candy is in its simplicity, requiring just a few basic ingredients and supplies that you probably already have in your kitchen.
Creating crystal candy is a journey that combines patience, precision, and a little bit of creativity. From selecting the right ingredients to understanding the science behind sugar crystallization, there are numerous aspects to explore and enjoy. In this comprehensive guide, we'll cover everything you need to know about making crystal candy at home. We'll discuss the necessary equipment, step-by-step instructions, troubleshooting tips, and even some creative variations to try. So, if you're ready to embark on a sweet adventure, let's dive into the world of crystal candy making!
Table of Contents
Understanding Crystal Candy
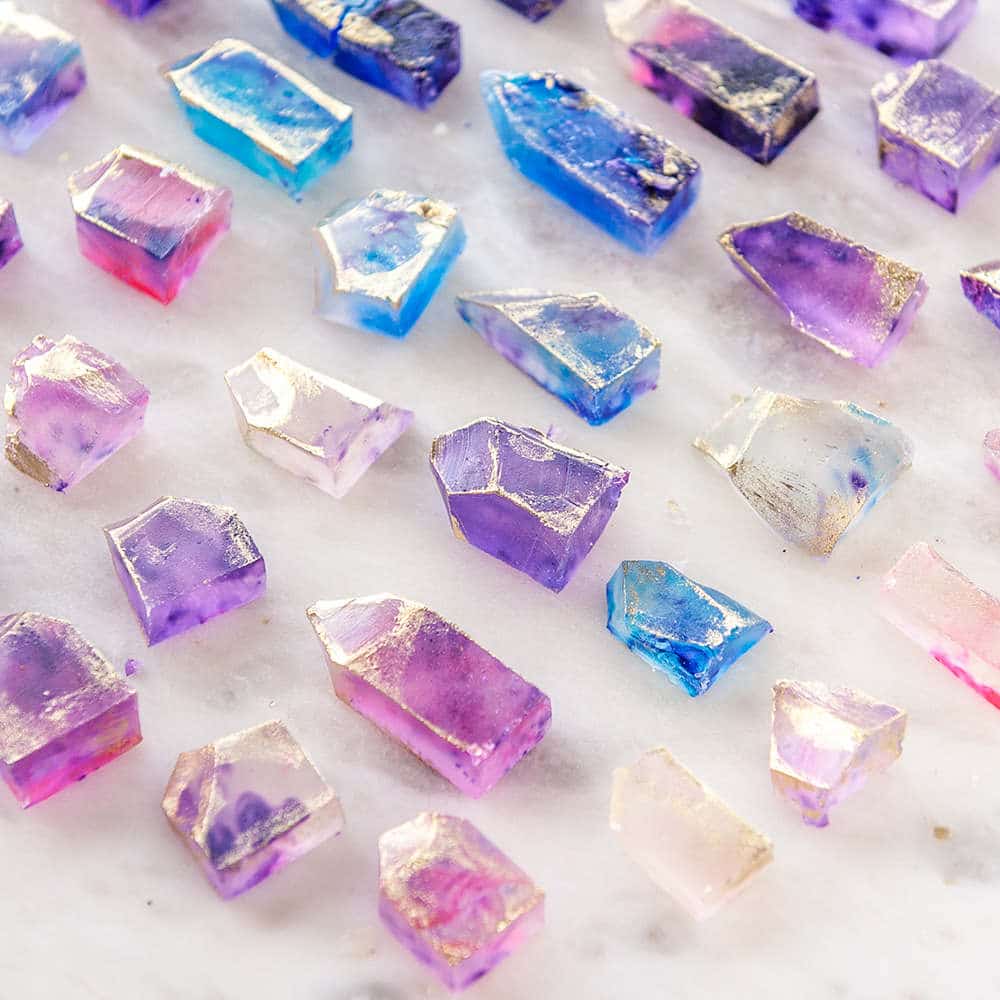
Crystal candy, also known as rock candy, is a confectionery marvel that has been enjoyed for centuries across various cultures. These sparkling treats are essentially large sugar crystals that form over time, resulting in a crunchy and sweet delicacy. The process of making crystal candy involves dissolving sugar in boiling water to create a saturated solution, which is then allowed to cool slowly. As the solution cools, sugar molecules begin to crystallize, forming the shiny, geometric shapes that characterize crystal candy.
Historically, crystal candy has been used not only as a delightful treat but also in various ceremonial and medicinal contexts. In some cultures, it is believed that the purity of sugar crystals can cleanse the palate and refresh the spirit. Today, crystal candy remains a popular treat, often used as a garnish for desserts, a sweetener for beverages, or simply enjoyed on its own.
The beauty of crystal candy lies in its simplicity. The basic recipe requires just sugar, water, and a bit of patience. However, the process is also highly customizable, allowing for the addition of flavors, colors, and even edible glitter to create a truly unique candy experience. Whether you're making crystal candy for the first time or looking to refine your technique, understanding the fundamentals of sugar crystallization is key to achieving perfect results.
Equipment and Ingredients
Before embarking on your crystal candy-making adventure, it's essential to gather the necessary equipment and ingredients. Fortunately, making crystal candy requires only a few basic supplies, many of which you may already have in your kitchen.
Equipment
- Saucepan: A medium-sized saucepan is ideal for boiling the sugar solution.
- Wooden Spoon: Used for stirring the sugar solution as it heats.
- Heatproof Jars or Glasses: These will hold the sugar solution as the crystals form. Clear jars are preferable so you can easily observe the crystallization process.
- String or Skewers: Used to provide a surface for crystals to grow upon.
- Clothespins: To suspend the string or skewers in the jars without them touching the sides or bottom.
- Thermometer: A candy thermometer can help ensure the sugar solution reaches the correct temperature.
Ingredients
- Granulated Sugar: The main ingredient for crystal candy. You'll need about 2 to 4 cups, depending on the batch size.
- Water: Essential for dissolving the sugar. Use about 1 cup of water for every 2 cups of sugar.
- Food Coloring (optional): To add vibrant hues to your crystal candy.
- Flavor Extracts (optional): Such as vanilla, mint, or fruit extracts to enhance the taste of your candy.
Once you have all the necessary equipment and ingredients, you're ready to begin the exciting process of making crystal candy. Remember, patience and precision are key to achieving beautiful, well-formed crystals.
Step-by-Step Guide to Making Crystal Candy
Now that you've gathered your equipment and ingredients, it's time to embark on the exciting journey of making your own crystal candy. Follow these detailed steps to ensure success in your candy-making adventure.
Step 1: Prepare the Equipment
Before you begin, ensure all your equipment is clean and ready for use. Take your heatproof jars or glasses and clean them thoroughly to prevent any impurities from affecting the crystal growth. Cut pieces of string or prepare skewers, and attach them to clothespins for easy suspension in the jars.
Step 2: Create the Sugar Solution
In your saucepan, combine the granulated sugar and water. Stir the mixture over medium heat until the sugar has completely dissolved. If you're using a candy thermometer, aim for a temperature of around 230°F (110°C). This will ensure the sugar solution is saturated, allowing crystals to form as it cools.
Step 3: Add Color and Flavor
If you wish to add color or flavor to your crystal candy, now is the time. Carefully mix in a few drops of food coloring and your chosen extract, being mindful not to introduce too much liquid, which could affect crystallization. Stir until the color and flavor are evenly distributed.
Step 4: Pour the Solution into Jars
Carefully pour the hot sugar solution into your prepared jars or glasses, filling them about three-quarters full. Allow the solution to cool slightly before proceeding to the next step.
Step 5: Insert the Strings or Skewers
Gently lower the prepared strings or skewers into the jars, ensuring they are suspended in the center without touching the sides or bottom. Use clothespins to secure them in place on the rim of the jars.
Step 6: Let the Crystals Form
Now comes the most crucial step—waiting for the crystals to form. Place the jars in a quiet, undisturbed area at room temperature. Over the next few days, you will observe the growth of sugar crystals along the strings or skewers. The process typically takes about a week, but you may begin to see results in as little as 24 hours.
Step 7: Harvest Your Crystal Candy
Once the crystals have reached your desired size, carefully remove the strings or skewers from the jars. Allow them to dry completely before enjoying your homemade crystal candy.
With these steps, you'll be able to create stunning crystal candy that's both a visual and culinary delight. Remember, each batch may vary slightly due to factors like temperature and humidity, so embrace the uniqueness of your creations!
The Science Behind Sugar Crystallization
Understanding the science behind sugar crystallization is key to mastering the art of making crystal candy. At its core, the process involves the transformation of sugar molecules from a dissolved state in a supersaturated solution to a solid, crystalline form.
When you heat sugar and water together, the sugar dissolves, creating a solution. As you continue to heat the mixture, the water evaporates, allowing more sugar to dissolve. This results in a supersaturated solution, which is unstable and eager to return to a more stable state. As the solution cools, sugar molecules begin to form bonds, creating the crystal lattice structure that gives crystal candy its iconic appearance.
The rate of crystallization is influenced by various factors, including temperature, concentration, and impurities. For instance, rapid cooling can lead to smaller, less defined crystals, while slow cooling encourages larger, more uniform crystals. Additionally, impurities in the solution can disrupt the crystallization process, leading to irregular formations.
By understanding these scientific principles, you can fine-tune your crystal candy-making process, experimenting with different conditions to achieve the desired results. Embrace the science and enjoy the sweet success that follows!
Troubleshooting Common Issues
Even with careful preparation, you may encounter some challenges when making crystal candy. Here are some common issues and solutions to help you troubleshoot and perfect your candy-making technique.
Issue 1: Crystals Not Forming
If your crystals aren't forming, it could be due to an insufficiently saturated solution. Ensure you're using the correct sugar-to-water ratio and that the solution reached the appropriate temperature. Additionally, check for impurities that may be interfering with crystallization.
Issue 2: Crystals Forming Too Slowly
Slow crystal growth can be attributed to a lack of nucleation sites. Try adding a small seed crystal to the solution to jumpstart the process. Alternatively, increase the concentration of sugar in the solution for faster results.
Issue 3: Crystals Are Cloudy or Irregular
Cloudy or irregular crystals often result from impurities or rapid cooling. To address this, ensure your equipment and materials are clean and allow the solution to cool slowly at room temperature.
Issue 4: Crystals Sticking to the Sides of the Jar
To prevent crystals from adhering to the jar, make sure the strings or skewers are suspended in the center. If necessary, adjust their position using clothespins to keep them from touching the sides.
With these troubleshooting tips, you'll be better equipped to handle any challenges and achieve beautiful, well-formed crystal candy.
Creative Variations of Crystal Candy
Once you've mastered the basic crystal candy recipe, why not explore some creative variations to add excitement and flair to your sweet creations? Here are a few ideas to get you started:
Flavor Infusions
Experiment with different flavor extracts to create unique taste combinations. Consider using citrus, almond, or even floral extracts like lavender or rose for a sophisticated twist.
Colorful Creations
Use food coloring to produce vibrant, eye-catching crystal candy. Try layering different colors in a single jar for a rainbow effect, or use natural colorants like beet juice or turmeric for an all-natural approach.
Edible Glitter and Sprinkles
Add a touch of sparkle to your crystal candy by incorporating edible glitter or sprinkles. These decorative elements can enhance the visual appeal and add a festive touch to your treats.
Themed Crystal Candy
Create crystal candy in shapes and colors that align with specific themes or occasions. For example, make red and green crystals for Christmas or pastel hues for Easter. Use molds or cookie cutters to shape the candy according to your theme.
With these creative variations, the possibilities are endless, allowing you to produce crystal candy that is as unique as it is delicious.
Safety Precautions in Candy Making
While making crystal candy is a fun and rewarding activity, it's important to keep safety in mind. Here are some essential precautions to follow during the candy-making process:
Handling Hot Sugar Solutions
Hot sugar solutions can cause burns, so exercise caution when heating and pouring the mixture. Use heatproof gloves or mitts to protect your hands, and keep children at a safe distance from the stove.
Monitoring the Cooking Process
Never leave the sugar solution unattended while it's on the stove. Overheating can lead to scorching or boiling over, resulting in a sticky mess that's difficult to clean.
Using Proper Equipment
Ensure all equipment is heat-resistant and suitable for candy making. Avoid using plastic utensils or containers that may melt or warp under high temperatures.
Storing Ingredients Safely
Keep sugar and other ingredients stored in a cool, dry place to prevent contamination or spoilage. Check expiration dates and discard any outdated or questionable products.
By following these safety precautions, you can enjoy a fun and safe candy-making experience.
Storing and Serving Crystal Candy
Proper storage and serving techniques will ensure your crystal candy remains fresh and delicious. Here are some tips to help you preserve your homemade candy:
Storing Crystal Candy
Store crystal candy in an airtight container to prevent moisture absorption, which can cause the candy to become sticky or lose its crunch. Keep the container in a cool, dry place, away from direct sunlight or heat sources.
Serving Suggestions
Crystal candy can be enjoyed on its own or used as a decorative element in desserts and beverages. Consider using it as a cake topper, cocktail stirrer, or edible centerpiece for your next gathering.
Gift Ideas
Crystal candy makes a delightful homemade gift for friends and family. Package it in decorative jars or bags, and add a personalized note for a thoughtful touch.
With these storage and serving tips, your crystal candy will remain a delicious and versatile treat for any occasion.
Frequently Asked Questions
1. Can I use brown sugar to make crystal candy?
While it's possible to use brown sugar, it may result in a different texture and flavor due to the molasses content. For clear, traditional crystal candy, it's best to use granulated white sugar.
2. How long does it take for crystal candy to form?
Crystal candy typically takes about a week to form, but you may begin to see results in as little as 24 hours. The growth rate depends on factors like temperature and sugar concentration.
3. Can I reuse the sugar solution for another batch?
Yes, you can reuse the sugar solution by reheating and adding more sugar to ensure saturation. However, the solution may become cloudy or less effective with each use, so it's best to start with a fresh batch for optimal results.
4. How can I prevent crystals from sticking to the jar?
Ensure the strings or skewers are suspended in the center of the jar and not touching the sides. Adjust their position using clothespins to keep them from adhering to the jar.
5. What can I do if my crystals aren't forming?
Check the sugar-to-water ratio and ensure the solution reached the appropriate temperature. Impurities may also interfere with crystallization, so ensure all equipment is clean.
6. Is crystal candy safe for children to make?
Yes, crystal candy can be a fun and educational project for children, but adult supervision is recommended, especially when handling hot sugar solutions.
Conclusion
Making crystal candy is a delightful and rewarding experience that combines culinary creativity and scientific exploration. By following this comprehensive guide, you'll be well-equipped to create stunning and delicious crystal candy at home. From understanding the science of sugar crystallization to exploring creative variations, this journey offers endless possibilities for customization and enjoyment.
Whether you're crafting crystal candy as a fun family activity, a unique gift, or a personal indulgence, the process is sure to spark joy and curiosity. So gather your supplies, embrace the magic of sugar, and embark on your own sweet adventure in making crystal candy!
For more information on the science of sugar crystallization, check out this Scientific American article.
ncG1vNJzZmivp6x7o77EnKKepJxjwqx71KmbmqyVmba0r9WeqW5nmKTEbsDOZqSao5VisLPF0q2YpWWTlrulxY2hq6ak